
Nymph fishing flies are a key part of any angler's toolkit, especially for those looking to catch trout and other freshwater fish. These flies mimic the underwater life stages of insects, which are a primary food source for fish. In this article, we’ll break down everything you need to know about nymph fishing flies—from what they are and why they’re effective, to popular patterns and essential techniques.
Key Takeaways
- Nymphs imitate the immature stages of insects, crucial for trout feeding.
- Using a variety of nymph patterns increases your chances of success.
- Choosing the right size nymph is important; sizes 16-22 are commonly effective.
- Weighted nymphs help sink faster, while unweighted ones offer a more natural drift.
- Timing your nymph fishing with seasonal and weather changes can lead to better results.
Understanding Nymph Fishing Flies
What Are Nymphs?
Okay, so what are nymphs? Basically, they're the immature form of aquatic insects like mayflies, stoneflies, caddisflies, and midges. These little guys live underwater, and trout love to eat them. They make up a huge part of a trout's diet, which is why nymph fishing is so effective.
Why Use Nymphs?
Why bother with nymphs when you could be throwing dry flies? Well, trout spend most of their time feeding underwater. Think about it: they're not always looking up for a tasty bug floating on the surface. Nymphs are available year-round, regardless of hatches. So, if you want to catch more fish, nymphing is often the way to go. Plus, it's a fun challenge to learn how to present them correctly.
The Life Cycle of Nymphs
Understanding the nymph life cycle can seriously up your fishing game. These insects go through incomplete metamorphosis, meaning they hatch from eggs, grow as nymphs, and then emerge as adults. Knowing when different insects are in their nymph stage helps you choose the right patterns and sizes. For example, if you know a mayfly hatch is coming, fishing mayfly nymphs can be super effective. Here's a simplified breakdown:
- Egg Stage: Insects lay eggs in the water.
- Nymph Stage: Nymphs live underwater, growing and molting.
- Emergence: Nymphs transform and emerge as adults.
Matching your fly to the current stage of the insect's life cycle can significantly increase your chances of a successful catch. It's all about giving the trout what they expect to see.
Popular Nymph Patterns You Should Try
Okay, so you're ready to get serious about nymphing? Awesome! Let's talk about some patterns that absolutely crush it on the water. I'm going to share a few of my go-to nymphs that have consistently produced results for me. These aren't just random flies; they're proven fish-catchers.
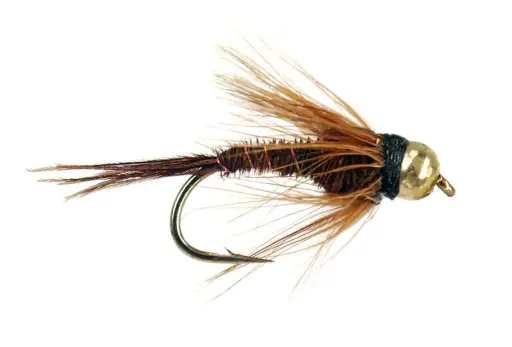
Rubber Leg Stone
This thing is a beast, plain and simple. If I'm fishing a river with any kind of current, especially a freestone river, this is often the first nymph I'll tie on. Stonefly nymphs are big, juicy meals that trout find hard to resist. I like to check the rocks in the river; if I see stoneflies crawling around, it's game on for the Rubber Leg. The rubber legs nymph give it a super realistic action in the water, which drives the trout wild.
TH Zebra Midge
Don't let the small size fool you; this midge is deadly. I usually use this when nothing else seems to be working. It's simple, effective, and the trout can't get enough of it. I like to fish it as part of a multi-fly rig, usually as a dropper below a larger, heavier nymph. The Zebra Midge is especially effective in tailwater fisheries or during the colder months when midges are the primary food source.
Bead Head Pheasant Tail
This is a classic for a reason. It imitates a ton of different mayfly nymphs, and the bead head helps it sink quickly into the strike zone. The flashback adds a little extra flash to attract attention, especially in murky water. I've caught fish on this pattern in just about every type of water I've fished. It's a super versatile pattern that should be in every nymph angler's fly box.
Nymphing can be tricky, but having confidence in your fly selection is half the battle. Don't be afraid to experiment, but these three patterns are a great place to start. Tie them on, get them in the water, and hold on tight!
Choosing the Right Size Nymphs
Okay, so you've got your fly box essentials ready to go, but how do you pick the right size nymph? It's a question I get asked all the time, and honestly, it can make or break your day on the water. Size matters, plain and simple. Too big, and the fish might spook. Too small, and they might not even see it. Let's break it down.
Common Size Ranges
Generally, when I'm stocking up on nymphs, I aim for a range between sizes 8 and 22. That covers most of my bases for trout. If I'm unsure, I usually start with sizes 16 to 22. These smaller sizes tend to work well in a variety of conditions. Here's a quick guide:
- Sizes 8-12: Larger stoneflies or crane fly larvae.
- Sizes 14-18: Mayfly nymphs, caddis larvae.
- Sizes 20-22: Midges, smaller mayfly nymphs.
When to Go Bigger
There are times when upsizing your nymph is the way to go. For example, if you're fishing in the spring when larger stoneflies are active, using a bigger nymph pattern makes sense. Also, if the water is murky or stained, a larger profile can help the fish spot your fly more easily. I've had success with larger nymphs in faster, deeper water too, as they tend to get noticed better.
Matching the Hatch
Matching the hatch isn't just for dry fly fishing; it's super important for nymphing too. The best way to figure out what size nymphs to use is to observe what's in the water. Flip over some rocks and see what's crawling around. If you see a lot of small mayfly nymphs, go with a smaller size, like a 18 or 20. If you see larger stonefly nymphs, bump up to a size 8 or 10. It's all about imitating what the fish are already feeding on.
I always carry a small magnifying glass with me. It helps me get a better look at the nymphs I find in the water. It might seem a bit extra, but it can really help you dial in the right size and pattern.
Here's a simple table I use as a starting point:
| Insect | Size Range | Season |
|---|---|---|
| Stonefly | 8-12 | Spring |
| Mayfly | 14-20 | Spring/Fall |
| Caddis | 14-18 | Summer |
| Midge | 20-24 | Winter |
Remember, this is just a starting point. Don't be afraid to experiment and see what works best in your local waters. Good luck out there!
Weighted vs. Unweighted Nymphs
Okay, let's talk about weighted versus unweighted nymphs. It's a pretty important thing to consider when you're out on the water. I've spent plenty of days experimenting with both, and here's what I've learned.
When to Use Weighted Nymphs
For me, weighted nymphs are go-to's in a few specific situations. If the water's deep or the current's ripping, a weighted nymph is almost a must. They help you get your fly down to where the fish are holding much faster. I also like using them when I want to avoid adding split shot to my leader, which can sometimes spook fish. Plus, a flashy bead head can be super effective in murky water – it gives the fish something to see. I find that drop rate is key to getting the fly to the fish quickly.
Benefits of Unweighted Nymphs
Unweighted nymphs definitely have their place too. I tend to reach for them when I'm fishing in shallower water or when I'm targeting fish that are easily spooked. Sometimes, the splash of a weighted nymph can be enough to send them scattering. Also, on bright, sunny days, the glare from a bead head can actually deter fish. An unweighted nymph presents a more natural, subtle presentation in those conditions. Here's a quick rundown:
- Delicate presentation in clear, shallow water
- Ideal for spooky fish
- More natural drift in slow currents
How Weight Affects Drift
The weight of your nymph has a huge impact on how it drifts through the water. A weighted nymph will sink faster and drift more vertically, which can be great for getting down to fish holding on the bottom. On the other hand, an unweighted nymph will drift more naturally with the current, which can be more appealing to fish that are feeding on nymphs in the water column. It's all about finding the right balance and matching your presentation to the conditions. I always consider the best nymph patterns for the water I'm fishing.
Essential Nymph Fishing Techniques
Dead Drift Technique
The dead drift is like, the bread and butter of nymphing. Basically, you're trying to present your nymph to the fish in the most natural way possible, like it's just drifting along with the current. The goal is to eliminate any drag on your line that would make the fly look unnatural. I usually achieve this by mending my line upstream, which means flipping the line upstream to counteract the current pulling on it. It takes practice, but once you get it down, it's super effective.
High-Sticking Method
High-sticking is a technique I use a lot in faster-moving water or when I'm fishing close range. Instead of casting way out there, I keep my rod tip high, almost vertical, to keep as much line off the water as possible. This gives me better control over the drift and helps me detect subtle strikes. It's tiring after a while, but it's worth it when the fish are holding tight to the bottom in those fast runs. I find it especially useful in pocket water situations where you need to get your fly down quickly and keep it there.
Euro Nymphing Basics
Euro nymphing, or tight-line nymphing, has become one of my go-to methods. It's all about maintaining direct contact with your nymphs. I use a long, sensitive rod and a thin, specialized line to feel every bump and tick.
The key is to use a weighted nymph or multiple nymphs to get down to the fish quickly and keep them in the strike zone. I move the rod tip to guide the nymphs along the bottom, and I'm constantly watching the sighter (a brightly colored section of line) for any indication of a strike. It's a very active style of fishing, but it's incredibly effective, especially in heavily pressured waters.
Here's a quick rundown of the gear I typically use for Euro nymphing:
- Rod: 10-11 foot, 2-4 weight
- Line: Thin, level line
- Leader: Long, tapered leader with a sighter section
Best Times to Fish Nymphs
Seasonal Considerations
Okay, so when's the absolute best time to chuck some nymphs? Well, it really depends on the season. Spring and fall are usually prime time. In the spring, you've got runoff happening, which can stir things up and get the fish feeding aggressively. Fall is great because fish are bulking up for winter. Summer can be good too, especially early mornings or late evenings when the water's cooler. Winter? Don't count it out! You might need to fish slower and deeper, but the fish are still there. Knowing the local hatch charts is super helpful.
Time of Day Tips
Time of day matters a ton. Early morning and late afternoon are often the best. Think about it: that's when the light is lower, and the fish are less spooky. Plus, insect activity tends to peak around those times. Midday can be tough, especially on bright, sunny days. But, if it's overcast, midday nymphing can be surprisingly productive. I've had some killer days fishing nymphs around lunchtime when everyone else is taking a break. Experiment and see what works best on your local waters.
Weather Impact
Weather plays a huge role. Overcast days are your friend. A little bit of rain can also be a good thing, as it washes insects into the water and gets the fish moving. Bright, sunny days can make the fish more cautious, so you might need to downsize your tippet and use smaller nymphs. High, muddy water after a big storm? That can be tough, but not impossible. Try using larger, darker nymphs that the fish can see.
I always keep an eye on the weather forecast before heading out. It helps me decide what flies to bring and what techniques to use. Don't be afraid to change your approach based on the conditions. That's what separates the good nymph anglers from the great ones.
Here's a quick guide:
- Overcast Days: Fish are less spooky, so you can use a wider range of nymphs.
- Rainy Days: Fish are often more active, so try larger, more visible patterns.
- Sunny Days: Fish are more cautious, so use smaller nymphs and lighter tippet.
- Windy Days: Can make casting tough, but can also stir up the water and get the fish feeding.
Nymph Fishing Gear You Need
Okay, so you're ready to get serious about nymphing? Awesome! Let's talk gear. You don't need a ton of fancy stuff to get started, but having the right equipment can definitely make a difference. Here's what I usually bring with me:
Rod and Reel Recommendations
For nymphing, I lean towards a longer rod, something in the 9 to 10-foot range 3 weight fly rod. A longer rod gives you better reach for high-sticking and managing your drift. I've been eyeing the Echo Shadow 2 Euro Nymphing Rod lately, heard great things about it. As for the reel, nothing too crazy is needed. Just make sure it has a smooth drag system and can hold enough backing. Balance is key – you want the rod and reel to feel comfortable in your hand for those long days on the water.
Line and Tippet Choices
For nymphing, I typically use a specialized nymphing line or a weight-forward floating line. The nymphing line is designed to be super sensitive, so you can detect even the slightest takes. For tippet, fluorocarbon is my go-to. It's nearly invisible underwater and has good abrasion resistance. I usually start with a 5X or 6X tippet and adjust based on water clarity and the size of the flies I'm using. Here's a quick guide:
- Low, clear water: 6X or 7X tippet
- Normal conditions: 5X tippet
- Murky water or larger flies: 4X tippet
Fly Box Essentials
Okay, this is where things get fun! You'll want a good selection of nymphs in various sizes, colors, and patterns. I always make sure I have a good mix of proven nymphs, like:
- Pheasant Tails: A classic for a reason.
- Hare's Ears: Another must-have pattern.
- Zebra Midges: Essential for tailwater fisheries.
- Stoneflies: Especially effective in freestone rivers.
Don't overthink it too much when you're starting out. A few reliable patterns in different sizes will get you on the fish. As you gain experience, you can start experimenting with different patterns and colors to see what works best in your local waters.
I also like to carry a few worm patterns like Cannon's Worm (Red) for when the water is a bit off color. Remember to organize your fly box so you can quickly find what you need. I try to carry at least 6 of each nymph, because losing flies is just part of the game!
Common Mistakes in Nymph Fishing
Overthinking Patterns
I've been there, staring into my fly box, completely paralyzed by choice. You've got dozens of nymphs, each slightly different, and you're trying to figure out the perfect one. Honestly, sometimes we overthink it. Trout aren't always that picky. A good general pattern presented well often beats the perfect imitation fished poorly. Don't get bogged down in analysis paralysis; focus on getting a good drift.
Ignoring Water Conditions
One of the biggest mistakes I see is ignoring what the water is telling you. Is it clear? Murky? High? Low? These things matter! If the water's high and off-color, those tiny, delicate nymphs aren't going to cut it. You need something bigger and brighter that the fish can actually see. And if it's low and clear? Time to downsize and get stealthy. Pay attention to the environment, and adjust your approach accordingly.
Not Paying Attention to Strike Indicators
Your strike indicator is your window into what's happening underwater. If you're not watching it like a hawk, you're missing strikes. It's that simple.
Here are some things to watch for:
- Hesitation
- Twitching
- Stopping
- Sinking faster than it should
If anything looks even slightly off, set the hook! You'd rather look silly setting the hook on nothing than miss a fish of a lifetime. Trust your gut, and don't be afraid to react. You'll be surprised how many subtle takes you were missing before.
Nymph Fishing in Different Waters
Rivers vs. Lakes
Okay, so fishing nymphs in rivers versus lakes is a whole different ballgame. In rivers, it's all about reading the current and getting that natural drift. You're trying to mimic what the trout are already used to seeing. Lakes, on the other hand, can be a bit more static, so you often need to impart some action to your nymph to get their attention. Think about the depth, too. Rivers are usually shallower, but lakes can get deep quick, so you'll need to adjust your fly fishing techniques accordingly.
Stillwater Nymphing
Stillwater nymphing, or fishing nymphs in lakes and ponds, requires a different mindset than river fishing. You're not just drifting your fly; you're actively retrieving it. This means experimenting with different retrieves – slow strips, quick jerks, or even a figure-eight motion. Also, don't be afraid to use longer leaders and floating lines to cover more water. It's all about finding what triggers the fish on that particular day.
Freestone vs. Tailwater
Freestone rivers and tailwaters each present unique challenges and opportunities for nymphing. Freestone rivers, which are primarily fed by snowmelt and rainfall, tend to have more variable water levels and temperatures. This means you need to be adaptable and willing to change your tactics based on the conditions. Tailwaters, on the other hand, are rivers that flow out of dams. They often have more stable water levels and temperatures, which can lead to more consistent hatches and feeding patterns. However, tailwaters can also be subject to sudden changes in water flow, so it's important to be aware of the dam's release schedule. I usually check the water levels before I go.
Understanding the characteristics of each type of water is key to success. In freestone streams, focus on finding areas where trout can escape the current, such as behind rocks or in deeper pools. In tailwaters, pay attention to the insect hatches and try to match your nymphs to the prevalent food source.
DIY Nymph Tying Tips
Basic Materials You Need
Okay, so you wanna tie your own nymphs? Awesome! First, you're gonna need some stuff. Nothing too crazy, but having the right materials makes a huge difference. Here's a quick rundown:
- Hooks: Get a variety of sizes (10-20) in both standard and jig styles. I like barbless for easy release.
- Beads: Tungsten or brass beads in different colors and sizes. These add weight and a bit of flash.
- Thread: I recommend 6/0 or 8/0 thread. Black, brown, olive, and white are good starting colors.
- Dubbing: This is what gives your nymph its body. Hare's ear, pheasant tail, and synthetic blends are all great.
- Wire: Copper or lead wire for adding weight and segmentation.
- Ribbing: Flashback material, tinsel, or even just more wire. This adds durability and attraction.
- Hackle: Partridge or hen feathers for legs and gills.
Step-by-Step Tying Guide
Alright, let's get into the nitty-gritty of tying a basic nymph. I'll walk you through a simple Pheasant Tail Nymph, which is a killer pattern.
- Start the Thread: Attach your thread behind the eye of the hook and wrap it down to the bend.
- Add the Tail: Tie in a few pheasant tail fibers for the tail. Keep it short and proportional.
- Weighting (Optional): If you want a weighted nymph, add some lead wire wraps to the hook shank.
- Form the Body: Dub your thread with hare's ear and wrap it forward to create a tapered body.
- Ribbing: Tie in a piece of copper wire at the tail and wrap it forward over the body in even segments. This adds durability and a bit of flash.
- Wing Case: Use a few more pheasant tail fibers to create a wing case. Tie them in over the thorax.
- Hackle (Optional): Add a few wraps of partridge hackle for legs.
- Finish: Tie off the thread, whip finish, and add a drop of head cement.
Customizing Patterns
This is where the fun really begins! Don't be afraid to experiment with different materials and techniques to create your own unique patterns. Here are a few ideas:
- Color Variations: Try different dubbing colors to match the local insects.
- Bead Colors: Experiment with different bead colors to see what the fish are keying on.
- Flash: Add some flashabou or tinsel to the body or tail for extra attraction.
- Legs: Use rubber legs or different types of hackle for a more realistic look.
Tying your own nymphs is not only a great way to save money, but it also allows you to create flies that are perfectly suited to the waters you fish. Plus, there's nothing quite like catching a fish on a fly you tied yourself!
Nymph Fishing Fly Box Essentials
Must-Have Nymphs
Okay, so you're building your nymph fly box, right? First things first, you gotta have the basics. I'm talking about the patterns that just plain work, no matter where you are. For me, that starts with a good selection of Pheasant Tails. Seriously, these things are like the bread and butter of nymphing. I always make sure I've got a bunch in different sizes. Then, I load up on Hare's Ears – another super versatile pattern that imitates a ton of different bugs. Don't forget some Caddis nymphs; those are essential, especially if you're fishing waters where caddisflies are common. And finally, a few Stonefly nymphs are a must, especially if you're fishing bigger, faster rivers. I also like to have a few European Nymphing patterns on hand, just in case.
Organizing Your Fly Box
Alright, so you've got all these awesome nymphs, but now what? Just throwing them all in a box is a recipe for disaster. Trust me, I've been there. What I do is get a fly box with compartments. I like the ones with foam inserts because they hold the flies securely and keep them from getting tangled. I organize my nymphs by size and type. So, all the size 14 Pheasant Tails go in one compartment, all the size 16 Hare's Ears in another, and so on. This makes it way easier to find what I need when I'm on the water. Plus, it helps me see what I'm running low on so I can restock my fly box before my next trip.
How Many Flies to Carry
This is a question I get asked a lot, and honestly, there's no magic number. But I can tell you what works for me. I like to have at least a few of each pattern and size that I think I might need. I try to carry around six of each nymph. It's not uncommon to lose a bunch of nymphs during a day of fishing. I'd rather have too many than not enough. Plus, it gives me options. If I'm not having luck with one pattern, I can switch to another without worrying about running out. I've found that carrying around 72 flies is a practical and manageable number of nymph patterns to work with. Having a good selection of nymphs is key to being prepared for anything the river throws at you.
Remember, it's better to be overprepared than underprepared. You never know what the fish are going to be eating, so having a variety of nymphs in your fly box is always a good idea.
When it comes to nymph fishing, having the right flies in your box is key to success. Make sure you include a variety of patterns that mimic the insects fish love. Don't forget to check out our website for tips on choosing the best nymphs and to explore our selection of fishing gear. Get ready to catch more fish!
Wrapping It Up
So there you have it! Nymph fishing flies are a must-have for any angler looking to up their game. Whether you’re a newbie or a seasoned pro, having a solid selection of nymphs can really make a difference. Remember to keep it simple—focus on a few key patterns that work in your local waters, and don’t stress too much about matching every hatch perfectly. Just get out there, experiment a bit, and see what the fish are biting. Happy fishing!
Frequently Asked Questions
What exactly are nymphs in fishing?
Nymphs are the underwater life stages of insects that fish like trout eat. They often look like small, wriggly bugs.
Why should I use nymphs for fishing?
Nymphs are great because most fish feed underwater. Using nymphs can help you catch more fish, especially when they are active below the surface.
What is the life cycle of a nymph?
Nymphs start as eggs, then hatch into larvae, and eventually become adult insects. This process is important for understanding when and what fish might eat.
What are some popular nymph patterns?
Some well-known nymph patterns include Pat's Rubber Leg Stone, TH Zebra Midge, and Flashback Bead Head American Pheasant Tail.
How do I choose the right size nymphs?
Common sizes for nymphs range from 8 to 22. If you see larger insects in the water, you might want to use bigger nymphs.
Should I use weighted or unweighted nymphs?
Use weighted nymphs when you want them to sink quickly. Unweighted nymphs are better for a more natural drift.
What are some essential nymph fishing techniques?
Some techniques include the dead drift method, high-sticking, and Euro nymphing, each helping you present nymphs effectively.
When is the best time to fish with nymphs?
The best times are usually early in the morning or late in the afternoon, especially in spring and fall when fish are more active.